Strawberry Oatmeal, almost as easy as instant!


Remember the days when making oatmeal was a matter of adding water to a package of flavored Instant Quaker Oatmeal  sticking it in the microwave for about a minute and voilà breakfast was made?

Thinking about my childhood, I remember all the flavor choices from the box and mixing two different packages together to make unique combinations – they were all so delicious! The only problem is they really aren’t all that nutritious.

When I changed the way I viewed food and started to pay more attention to the nutritional impact they had on my body, stuff like Instant Oatmeal were among the first to go.

But oatmeal, even instant, is good for you right?
Well the answer is both yes and no. While oatmeal is one of the healthiest grains you can eat, flavored instant oatmeal contains more bad than good.

Why? Unless it’s plain, it’s loaded with junk. Junk like sugar, sodium, and artificial flavors/coloring. Even if it does taste good, how does it benefit your body? Or better yet, how does it damage your body?

Without going into all the nitty-gritty of why flavored Instant Oatmeal isn’t good for you, let me talk about an oatmeal that IS good for you!

Steel-cut oatmeal is an amazing grain!  It’s hearty (both in lowering cholesterol and keeping you full) and beneficial (especially to your blood sugar and your immune system).

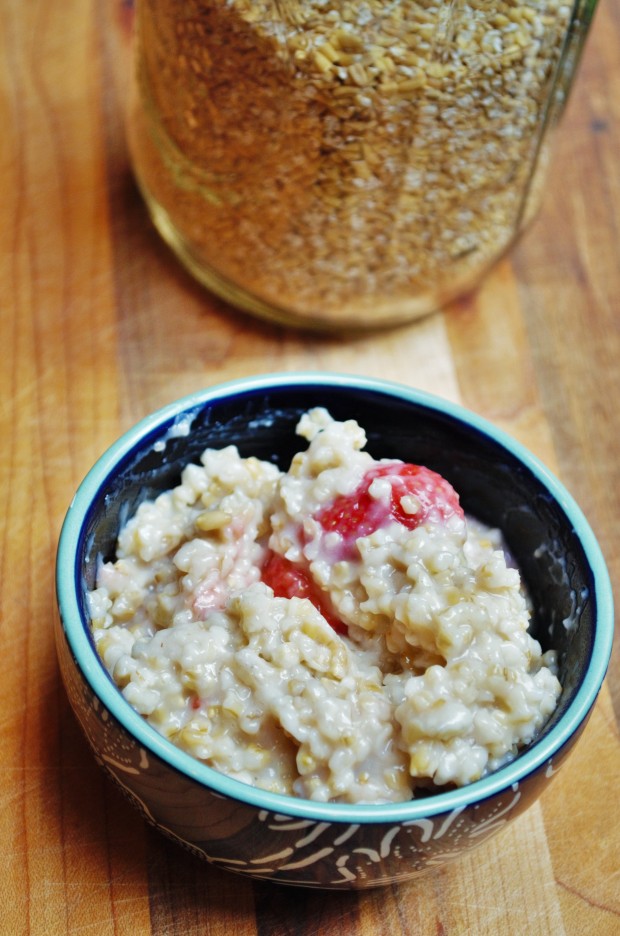
steelcut oatmeal

Unfortunately, it does take 30 minutes to make and for most people that’s not really in the “quick & easy” category like instant oatmeal. However, there is a way to make it quick & easy!!

When making steelcut oatmeal in our house, we usually make a big batch on the weekend for the week. That way we have a great breakfast that we can heat up (or eat cold) in the morning. (It’s great travel food too.)  This makes it not only easy but it’s also quicker than instant when it’s pre-made!! Wahoo!  This is especially helpful with a newborn in the house. 🙂

It’s also healthier, heartier, and believe it or not tastier than instant!

I thought I’d share a recipe that I made today that totally reminded me of that strawberry flavor from Quaker’s Instant Oatmeal–that I used to eat just straight out of the packet. 😉

Steelcut main with logo

Steel-cut oatmeal is a little tricky at first to make but once you get it down you can pretty much walk away and do other things for a half hour. (warning: before walking away for a half hour, make sure you stand near-by first round or else you might end up with an oatmeal explosion all over your stove!) There are several ways to make this, I’ll share the way I’ve found to be the least explosive! 🙂

Ingredients:

2 cups dry steel-cut oats (I use Bob’s Redmill Gluten Free version)
4 cups water
1/2 cup frozen strawberries
3-5 drops of liquid stevia

Directions:

Combine water and oats into a stainless steel pot, cover and turn heat to high.  Cook for 2 minutes on high heat, turn heat to low and cook for 30 minutes.
After 30 minute, turn off heat and remove lid.  Stir and add 3-5 drops of liquid stevia, then mix in the strawberries. Cover with lid and allow residual heat to soften strawberries for approx. 2 minutes.

steelcut up-close

Serve and enjoy and/or transfer to glass sealed container, refrigerate and enjoy throughout the week!

Instant Strawberry Oatmeal

Steelcut main with logo

Ingredients
  • 2 cups steel-cut oats
  • 4 cups water
  • 1/2 cup frozen strawberries (or fresh strawberries)
  • 3-5 drops liquid stevia (or sweetener of choice)
Directions
  1. Fill a medium sized pot with 4 cups of warm water
  2. Add 2 cups of steel-cut oats
  3. Stir, cover, and heat on high for 2 minutes
  4. Reduce heat to lowest setting and allow to cook for 30 minutes
  5. Remove from heat, stir and mix in liquid stevia (add to taste of desired sweetness)
  6. Mix in frozen strawberries and cover for 2 minutes allowing strawberries to thaw and soften from residual heat.
  7. Serve hot or allow to cool before storing in fridge.
  8. Will keep for approximately 5 days, though it rarely lasts that long!!

P.S. Even though my day is crammed to the max with taking care of the little one, I’ve really wanted to post a  recipe that’s not too complicated.  I thought, “why not blog about one I make all the time?” As simple as it may seem this easy oatmeal recipe is one that has kept me alive the past 2 months with a baby!  Not only is it healthy, it’s also excellent for boosting breast milk production AND it’s a quick grab out of the fridge when I’m like super-mega hungry-which is practically all the time!

p.p.s This “easy” blog post took a total of 9 hours from start to finish with baby interruptions. 😉

Chocolate Chia Pudding Gummies (Guest Post – RECIPE!!)


 *All New* Guest post from a fellow healthy eater/chef who makes the most amazing gluten-free options and gears her cooking towards the Paleo audience at her website: Cook It Up Paleo.  Heather comes up with amazing healthy options for the adored (unhealthy) foods like her newest recipe for Graham crackers – something I never thought I’d be able to eat again!  She makes it using cassava flour & coconut flour, instead of wheat, rice, or sorghum flour.  She uses really healthy ingredients too, so not only are these delicious but they are packed with nutrition.  She did it again with this latest recipe the Chocolate Chia Pudding Gummies–Which we get to snack on first!   You must check out her blog. 

Alright, let’s get to that recipe!  Thanks again Heather for taking the time to come up with this recipe for my readers.  Enjoy everyone! ❤

  JEM-Signature


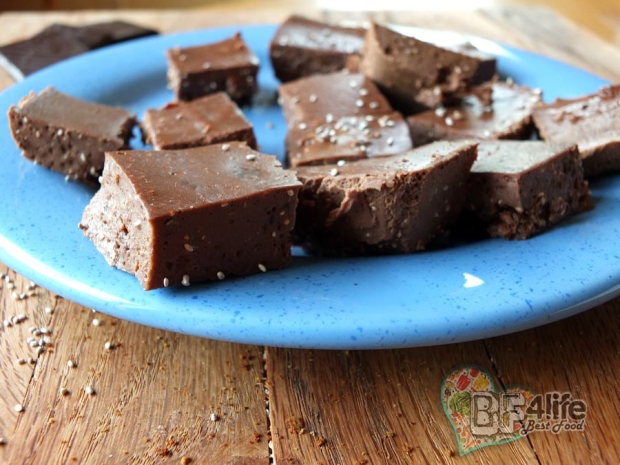
chochiagummies2

Chocolate Chia Pudding Gummies

Hi everyone! My name is Heather Resler and I am so excited to be guest posting for Jem! I am the 18 year old blogger behind Cook It Up Paleo. I was diagnosed with celiac disease at age 16, and have regained my health through a healthy lifestyle and a paleo diet.

But now on to this recipe. It’s basically a conglomeration of all the things I love: chocolate, chia seeds, coconut, and pudding!

These gummies are easy to make and taste delicious. The gelatin is amazing for the hair, skin, and nails, and the chia seeds have nourishing fiber. And the chocolate is good for you too, of course!

chochiagummies1

Chocolate Chia Pudding Gummies
  • 1 cup full fat coconut milk
  • 2 tablespoons chia seeds (white or black; doesn’t matter)
  • ¼ cup unsweetened cocoa powder
  • 2 tablespoons maple syrup
  • Pinch salt
  • ¼ cup water
  • 3 tablespoons grass-fed beef gelatin
  1. In a small saucepan, combine the coconut milk, chia seeds, cocoa, maple syrup, and salt. Mix well and bring to a boil.
  2. Meanwhile, stir together the water and gelatin to dissolve.
  3. As soon as the coconut milk mixture boils, remove it from the heat and whisk in the dissolved gelatin.
  4. Pour the mixture into a glass standard-sized loaf pan and chill until set.
  5. Cut into squares and enjoy! Store in an airtight container in the fridge.

Chocolate Chia Pudding Gummies

Chocolate Chia Pudding Gummies

chocchiagummies3

  • 1 cup full fat coconut milk
  • 2 tablespoons chia seeds (white or black; doesn’t matter)
  • ¼ cup unsweetened cocoa powder
  • 2 tablespoons maple syrup
  • Pinch salt
  • ¼ cup water
  • 3 tablespoons grass-fed beef gelatin
  1. In a small saucepan, combine the coconut milk, chia seeds, cocoa, maple syrup, and salt. Mix well and bring to a boil.
  2. Meanwhile, stir together the water and gelatin to dissolve.
  3. As soon as the coconut milk mixture boils, remove it from the heat and whisk in the dissolved gelatin.
  4. Pour the mixture into a glass standard-sized loaf pan and chill until set.
  5. Cut into squares and enjoy! Store in an airtight container in the fridge.


About Heather at Cook It Up Paleo

heather circleMy name is Heather Resler and I am 18 years old. I’ve been eating paleo since I was 14. I love to cook, take pictures, and learn about the scientific side of nutrition. When I’m not doing those things, I’m usually writing a blog post, watching Psych on Netflix with my family, lifting heavy things, or grabbing a black coffee from the local coffee shop. Check out my blog, Cook It Up Paleo, and my ebook, Grain-Free Family Favorites, and don’t forget to follow me on Facebook, Instagram, Twitter, and Pinterest. 🙂


Welcome Baby Clementine!


Born June 3rd, 2015 the world welcomes little miss Clementine.

 baby Clementine

We are so happy to have her in our lives and she truly is a perfect little angel.  🙂

I want to thank all my friends and family for their support throughout the nine months, especially my husband for his unconditional love and patience.  During labor his ability to support me and understand my needs was more than I could have dreamed for.  He is truly capable of anything and I am the luckiest woman in the world to have that kind of love and support.  He also left a lasting impression with the nursing staff with how well he was able to guide me through labor and gift me a feeling of protection throughout the whole labor.

I am especially grateful for my doula Tracy Coons who was able to make it back safely from Australia in time for labor!  While there weren’t many things that were followed on my birth plan (due to real circumstances, it was nice that I had her support and guidance.)  Her vast knowledge during my pregnancy was invaluable!  We are so fortunate to have had such a great support up until our baby was born.

I am also thankful for my grandma who was able to help out anyway she could during my pregnancy, especially with regards to the nursery and her amazing sewing skills! 🙂

My friend Alexis for her vast knowledge in all things babies!  She was so entirely helpful with helping me gear up for the baby.  My breast pump is my best friend right now and she is totally right about all the things I would need starting out!! 🙂  I’m also thankful for her experiences and support throughout pregnancy too as there was really a lot to learn which was shared from her experiences.

And thank you to all my friends who were supportive especially when I found out I had ICP.  There were a few days when I was really down and everyone all seemed to get a magical memo to really make sure I was doing well during those rough times.  I am very grateful for your kindness and caring selves. 🙂

I would also like to thank my network of medical care providers: my therapist, chiropractor, acupuncturist, naturopath doctor, and team of midwives.  There are so many things that all of them helped me through in one way or another that I can’t possibly list out in one paragraph.  All of them helped me numerous ways throughout the nine months up to labor.  During labor both Kim and Jenny (midwives) were very awesome to work with.  Jenny who took on most of the hours of labor was absolutely amazing and really came through in working with me on every which way they could have in order for me to have the labor I desired.  Although I wasn’t able to have everything go as ‘planned’ everyone really pushed through for me to follow my birth plan as closely as possible and I couldn’t be more thankful for that.  The experience was one I’ll always remember and cherish.  I felt empowered, strong, and supported beyond what I believed imaginable.

Last but not least, thanks to all my readers for joining and reading my blog posts.  It was very encouraging to have an audience and support group from my blog.  I love reading the comments and seeing “likes” on a post- especially when I get new followers!  This became really helpful as the months progressively became slower and slower as I got more and more pregnant!  I felt like I had another job (good job) and the blog gave me another goal to work towards weekly.

I will be posting pictures of the nursery as soon as I can!  Right now I am focusing on breast feeding and sleeping, trying to make headway in creating a routine.  So far today, I was able to get enough time (1hr) to write a blog post!! 🙂  Yay!!

The picture (above) was taken yesterday by Marissa Corona at www.marissacorona.com

Pregnancy Update (35 Weeks pregnant) Getting closer!!


Wow!

While things have definitely been centered around the baby the past 8 months, I will say that the past few weeks they have been kicked into overdrive.  Since, being diagnosed with ICP I now have to go to the hospital (midwifery unit) twice a week and I get my blood drawn once a week.  In addition, I’m adding chiropractic care and acupuncture to the growing list of appointments in order to ‘ripen’ my cervix.  The appointments are geared towards making sure that I will be ready (or as ready as possible) to go into labor once the time comes.  I have also been doing a lot of work at home.  Last week flew by super fast and this week even faster, which is both good and bad.  Good because things are getting done each day that passes and bad because it’s really going too fast!  I’ve almost purchased everything I ‘think’ I need before the baby is born, though it’s overwhelming the amount of items that are needed.  I’ve been trying to get in the baby room to take pictures of the walls for the blog and I do apologize for not posting them yet.  The room has little things that are in the works, but is pretty much completely finished being painted.  There are two things I need to paint and I plan on doing that within the next few days.  Tomorrow, I may do it.  I have to focus on my school work before the class is over and then I get some time before my next class starts (because I am having a baby).

Last Saturday, Scott and I had our first pictures taken as a couple.  What better time than when we’re on the last few weeks of pregnancy???  🙂

The pictures were done by a local photographer near Seattle, Wa.  Her business is Photostories by Marissa Corona and she is absolutely fantastic! 🙂

I wanted to share one of the many pictures she took from our photo session last Saturday at Pine Lake.  We are so ecstatic about how the session went and can’t wait to get our full set of photos.  This was sort of a ‘sneak peak’ for us!

She will also be photographing the baby too and that’s also very exciting!  Especially since she is planning on photographing her in her own nursery.  🙂

Black & White

Pregnancy Week 35 Saturday Pine Lake Park

I actually love her signature too, just very sweet. 🙂

Color

Pregnancy Week 35 Saturday Pine Lake CoLor

If you are looking for a fantastic photographer who is very good with people and has a very special and awesome skill (in the Washington area) I definitely recommend checking her out.

Well, I have to get back to school work.  In next week’s post, I want to include a list (and hopefully pictures) of all the things I got when prepping for the baby.  This may end up being the following week, depending on how the appointments go.  Unfortunately, I don’t think I’ll be posting any blog posts on recipes until after the baby is born.  My plate is extremely full and I can feel myself getting overwhelmed which means that I need to take breaks when I can.

Last week’s tests results also came back this week and my bile acid tests went down from 28 to 13!  This is excellent!!  Also, I am doing what’s called the NST (Non-stress test) twice a week at my appointments which basically monitors the baby’s heart rate and makes sure that in a 20 minute period she gets her heart rate up and comes back down to what is considered her resting heart rate.  She’s been doing awesome and this past time she got her heart rate up both times within the first 5 minutes, so mom got to take a short 10 minute nap for the remaining time.  We are getting more and more excited with each passing day.

The past few days Scott hasn’t been feeling 100% and had a pretty bad allergy attack which knocked his immune system in half.  Poor guy.  I’ve been doing my best to take care of him and myself during this time.  I feel for him and I wish that we weren’t both suffering from such strong histamine reactions, but tis the season for things to be fluffing around in the air.  Especially our dog’s coat which is being blown this past month-OMG!  I have never seen so much hair in one period of time, it’s ridiculous!  He’s an Akita and they do blow their coat twice a year, but because he was a puppy last year and he barely shed his coat over the fall season we got a full dose of a blown coat this spring.  Boy did we pay for that!  You could literally not pet the dog without pulling off little fluffy rabbits in the process.  Seriously!  It was overwhelming and definitely overwhelming to Scott’s system. 😦

Now, I’m on fur patrol and dog maintenance.  I need the hubby at 100% when this little girl comes!!!!

That’s all for now.  Hope everyone is doing well and staying healthy!

Till next time~

JEM-Signature


Intro to the Anti-Candida ‘Diet’


Candida diet INTRO

With the Candida Diet, many people may experience ‘die-off’ symptoms and we understand that completely.  Most of our ‘die-off’ symptoms occurred over a period of time of 2 years when we were removing gluten..then dairy..then meat.. then rice.. then eggs..then soy…then, well, you get the point.  Those were also very challenging times, especially when we were juicing to deepen our ‘detox’ to heighten our ‘symptom’ awareness.  I’m using these terms freely to communicate the measures we took to get our health to where it is today.  We eliminated processed foods which was VERY hard, especially bread for me.  I love bread and that includes all the varieties of ‘gluten-free’ bread which are ever growing.

I’ve since realized that it’s not necessarily the actual bread as it is the yeast that grows the bread and it makes total sense that our bodies aren’t really made for that particular ‘yeast’.

If you are interested in learning more about the ‘yeast’ connection, I highly recommend a book called “The Yeast Connection” by William G. Crook, M.D.

I’ll quickly go over it with you so you can understand what it’s about.  First and foremost, I want to say that something that helps incredibly before doing this type of ‘diet’ is a 7-10 day juice-fast.  If you can do it longer more props to you though it’s not entirely necessary and may exhaust your mental and physical capacity.  Always check with your own doctor before trying any diet or detox as each body is different and requires unique attention to those individual needs.  The juice fast along with eating healthier for a period of time helped us tremendously in transitioning into the anti-candida diet.  There was a lot less ‘die-off’ issues felt at the time of beginning the stages of this diet at which we were able to skip phase one and jump right into phase 2.  As in we don’t eat fast food, processed food, processed sugars, sugar drinks, coffee, etc. so we don’t need to ween ourselves off of that food.

Secondly, please only attempt to do this type of diet if you are serious about truly helping your body.  Regardless of the diet labels or implications you can have a form of Candida even if bloodwork results test that you do not have the particular Candida Albicans.  In my opinion (based off of my own research) Candida is a hard thing to label and this is because everyone has Candida.  Candida in its intent is actually good for the body as it helps the body to decompose once the body has died.  However, due to modern diet Candida has grown in many people causing many health issues.  Again, this is a disputed condition and really not one that many can seem to agree on.  That’s okay.  You’ll learn that the foods you have to eat in the anti-candida regimen diet are actually foods that are pretty primitive and align with many of our ancesteral type diets.  However, I wouldn’t put this in the category of say Paleo because Paleo allows for more types of foods than the Candida diet does-because we’re removing mold agents from the body as well.  Food is to be at it’s utmost cleanest and healthiest form.  When you are dealing with the immune system and healing the body, you don’t mess with unknown and unnecessary components such as GMO and pesticides.  Even if I wasn’t eating the anti-candida diet, I wouldn’t eat GMO or pesticide food anyway.  That however is a different topic for a different day and if you are interested in maybe watching an informative commercial that was advertised in Brazil, I highly recommend checking it out (yes it has subtitles).

In Chapter 11 of the (soft cover-updated) book there is an outline to the Candida Control Diet (with update).

Here is a sample of the anti-candida diet from “The Yeast Connection”:

During the early weeks: Foods you can eat freely…

Most vegetables, they can be fresh or frozen and you can eat them cooked or raw.

Asparagus, Beets (though I avoid these because they are very high in sugar), Broccoli, Brussel Sprouts, Cabbage, Carrots, Cauliflower, Celery, Cucumbers, Eggplant, Green Peppers, Greens: Spinach, Mustard, Beet, Collards, Kale, Lettuce-all varieties, Okra (not canned), Onions, Parsley, Radishes, Soybeans (although I personally do not recommend soy), string beans, tomatoes (not canned), Turnips (another one I don’t recommend as it’s a relatively high starch and can cause some immune system reactions).

Meats and Eggs including: Chicken, Turkey, Beef (lean cuts), Veal, Pork (lean cuts), Lamb, Wild Game, Eggs, wild Salmon, wild Sardines, wild Cod, Mackerel, seafood (I don’t recommend all types of seafood as there are higher contaminants and mercury present which can be toxic to a healing immune system and of course your liver.)

Nuts, Seeds & Oils (unprocessed): Almonds, Brazil Nuts, Cashews (eat these less in the beginning stages as they tend to have more mold than other nuts), Filberts, Pecans, Pumpkin Seeds. Oils: Linseed, Safflower, Coconut, Sunflower, Walnut and Ghee (use in moderation).

There is also a list of foods you can ‘eat cautiously’ but we avoid completely such as ‘squash’ or ‘sweet potatoes’ they are more starchy foods and can cause some immune reactions, but they are also dependents and you should not eat these more than once a week if you do eat them after stage one.

Avoid yeast.  After stage one, test your body and see how your body reacts to quinoa.  Personally, that’s the only grain we eat when we eat a grain.  Want a harder die-off reaction, eat more grains and starchy foods.  We would like as easy of a healing process as possible, so we avoid these foods.

Avoid list: Sugar and sugar containing foods (including honey’s of all types such as Manuka honey).  In the second stage you can use Yacon Syrup, however it is a lot more expensive and you will use less.  It doesn’t taste like your standard sugar either and has a taste that crosses between agave and molasses.

Avoid canned and processed foods (check label, make sure no sugar in any form as been added).  The way I handle this is I don’t buy canned foods and bottled foods the ingredients must say the contents inside.  For example, if I’m buying tomato sauce I buy bottled organic tomatoes with the single ingredient of tomatoes.

Avoid cheeses, alcohol, condiments, breads/pastries, malt, processed or smoked meats (which all contain sugar and yeast), mushrooms (edible fungi), Melons, Coffee, fruit juices, canned or dried fruits and eat as fresh as possible.

The book offers some recipes, though I believe they still contain foods that I don’t agree with (such as wheat) and some recipe books (not necessarily the yeast connection) offer recipes which completely contradict the advice given to avoid.  I make up my own recipes 95% of the time and you’ll notice that the recipes in this book are pretty much a no-brainer.  Like sautéed or steamed broccoli.  To me this is boring, so I use my creative talents and work on my own recipes.  Some of which you’ll actually see have made it to this blog.  There are many others and I’m working to post a lot of those (as soon as I find a time-stopping watch).  There are also some recipes which I am keeping for my cookbook-stay tuned for that one!)

I’ll post more information on the Candida diet as I have time to write more about it.  The book I mentioned above really does give you a great idea of how to go about in understanding how Yeast and Sugar work in your body to develop what they term as the “yeast connection”.  Another helpful book is called “The Ultimate Candida Guide and Cookbook” by Dr. Cobi Slater.  There are a great amount of facts present in this book as well as a great set up for learning how to manage candida.  The author does offer supplement recommendations and of course is selling these supplements through her online store.  She has some decent recipes, though most I find taste like cardboard.  Also, there are a couple of contradicting ingredients (such as Diaya cheese which contains yeast) and as you could have probably guessed you are supposed to avoid yeast.  The Yeast Connection  has you refrain from eating yeast for 7-10 days and then has you do a yeast test.  Personally I think that yeast should be avoided at all costs as you may not be able to sense the ‘symptoms’ or may test inaccurately.  For example, my husband doesn’t experience any ‘yeast’ symptoms however, when we did an immune blood test it showed that the yeast was passing through his digestive tract and causing ‘immune’ response by being present in his blood.  He was testing high for all forms of yeast, including nutritional yeast.

I always source from more than one book and I recommend you do the same.  I have 4 books on Candida and I’ve done extensive lab research/medical research on articles relating to Candida.  While a lot of the information is agreeable to the books I’ve read there are also some contradictions that I take more caution to.  For example, you’ll notice right away that Apple Cider Vinegar is both recommended and not recommended.  This was an obvious contradiction that I immediately recognized.  Some people say that ACV is okay and ‘good’ and some say it’s not.  From the research I have done, I do not believe that ACV is okay when healing the gut and candida.  There are plenty of other alternatives that will help in ‘die-off’ of candida and it is not necessary for the use of ACV.  There are several other contradictions, but this is just an obvious one that can be easily found if you do a quick search online.  If you are planning on doing the anti-candida diet, please do your research first and second please take it seriously.  This is not the Atkins diet or Jenny Craig, this is a serious attempt to heal the body.  That being said, expect to make permanent changes in your diet.   While the anti-candida diet is very strict it’s also a very useable foundation for you to grow your food repertoire.  For example, I don’t recommend eating a cheeseburger when you finish your anti-candida cleanse diet.  You’ll have to start small and incorporate foods that you’ll want to continue eating for the rest of your life.  Consider whether or not you need to eat a cheeseburger first, then second work on what you can eat.  Can you eat dairy?  If you have done 6 months of healing, you’ll most likely be able to eat cheese but I recommend testing that out first.  Also, keep in mind that you may or may not have ‘symptoms’ from eating that cheese.  Also, I recommend starting with a cheese that’s more mild like a sheep or goat cheese.  (assuming you don’t have a past history with extreme intolerances to sheep or goat cheese in particular)

Blood tests are always a great option if you are unsure.  You’ll have to do this after you’ve ‘tested’ out something you are wanting to incorporate into your regimen.  It needs to be in your system in order to see whether or not it’s passing through the digestive system and entering your blood.  Blood tests are much more reliable but like everything else they aren’t always perfect.  If you notice that you have a reaction of some sort, hives are the most obvious but phlegm is also a good indicator of a ‘symptom’ which might be passed up if you’re not familiar with reactions.  Dry nose, flaky scalp, itchiness, dry mucus, coughs, etc.  These are all ‘symptom’s’ of an allergic response.  Some may be digestive such as feeling swollen, bloaty, having gas, constipation, diarrhea, etc. this would be a ‘digestive’ symptom.  There are so many other types of reactions/symptoms that you really have to be aware of your body.  If you feel different in any way, don’t write it off as just a ‘feeling’ you had that day.  For example, if you are more moody, irritable, tired, fatigued, or if your memory, vision, aches or pains are noticeable you should probably make them notable and document what you ate the past day or two.  Your reactions/symptoms may not be immediate.  You may have them a day later a few days later, etc.

This is why the field of nutrition is so large.  There is a lot to pay attention to and a lot to note as important.  It’s never just cut and dry.  One thing is certain though, everything is related.  The body works synergistically with all the components of the body so if you’re feeling a certain way it could be based on something you ate directly or it could be an indirect response like you’re not getting enough magnesium.  You may have a sudden craving that could be an indicator of something your body may ‘need’ that may seem to you like a random craving for chocolate.  From my studies and research there are always implications that when there is a craving there is something deeper that’s causing that craving.  Like, for most people when they get ‘hungry’ it is because they are actually ‘thirsty’.  Do you see how complex healing the body can be?  That’s why there are Naturopath Doctor’s (N.D.’s), Nutritional therapists, Dieticians, Nutritionist, Doctors, psychologists, etc..etc..

The body is just an amazingly awesome complexity.  I believe there is a reason for western medicine doctors as there is  for naturopath doctor’s.  I believe that everyone should work on cleaning their body and maintaining optimal health so each person can understand why specialists are required and the specialist can better help the person in need by accurately prescribing help.

Does the world of natural medicine and western medicine find synergy and homeopathic balance themselves?  Unfortunately, they don’t always mesh well together which is why it’s even more important to do your research when finding a doctor.  The doctor should be open to both advanced medicine practices and homeopathic medicine alternatives.  The body is not something that can easily be diagnosed.  The body needs a good environment to maintain function so that when something is wrong it can get the help it demands.  This could be as simple as taking a Vitamin D3 supplement or as complex as taking a Ursodial capsule to help with Intrahepatic Cholestasis of Pregnancy.  It’s important to know the difference and educate yourself on your body.  If there’s anything we can control it is what we put inside our own bodies and how we treat the health of our body.  Everything else is genetics, epigenetics, and evolution- simply put but not easily translated. 🙂

Thanks for reading and I’d love to hear your feedback!

JEM-Signature

Pregnancy Update (34 Weeks pregnant) and anti-Candida, PCOS, and ICP….


Last post of my pregnancy update was at 30.79 weeks pregnant and a lot has actually happened since then.

Pregnancy-week 34

My goal throughout pregnancy was to update as often as possible with the intention of doing a post at least once a week.  However, with everything that I am working on (school, cookbook, recipe, pregnancy, etc.) I haven’t found enough time to do a post as often as I’d like.  Take for example, my last post of pregnancy update about 4 weeks ago.  At first I was a little hard on myself and then I realized that this is just the way it’s going to have to be and I have to be okay with that.  I’m working on blogging more and I continue to do what I can when I have time and quite frankly that IS good enough. No matter what the opinions swirling around in my head have to say.

The past 4 weeks have been extremely eventful and hard.  If you don’t already know, I am currently going to school for my MNT (Master Nutritional Therapist) and I take my education very seriously.  I also take my family’s health very seriously as well.  Over the past few months I’ve been helping my husband fight the yeast overgrowth in his body and if anyone is addressing leaky gut or Gaps or is following a real Anti-Candida protocol they know that it’s fairly challenging.  Luckily over the past few years we’ve eaten fairly strict and have found by listening to our bodies that narrowing our diet based on our ‘symptoms’ through an almost deduction diet is really what got us in ‘tune’ with our body.  Doing this, allowed for the transition into something as strict as an Anti-candida diet as an almost ‘natural’ next step process.  If you’d like to read more about that in another blog post I wrote click: Anti-Candida ‘Diet’.

Back to the pregnancy update…

The past few weeks I’ve been working on my own health as well.  While I am eating mainly the anti-candida diet, I am also including some fruit in my diet for the baby.  I don’t need a lot of sugar and usually eat an apple or 1/2 grapefruit each day.  I personally feel that this diet is a very good foundation diet to keep my body running optimally and deliver nutrients to my daughter efficiently and effectively.  Plus, I really don’t have the energy to make 2 separate meals for dinner when there really isn’t any reason.  Of course I eat healthier now than I did before I was pregnant.  Which actually played a significant role in helping with my analysis of my body the past few weeks.

If you’ve been following my blog or know me personally, you’ll know that I was told I had PCOS several years ago prior to being pregnant.  With that comes a lot of useful knowledge about my body.  For example, how my body handles sugar (insulin resistance) and how the thyroid functions (hormone response).  There is a negative aspect to PCOS where the label puts people in a box.  The box is: you have to take thyroid medication, you have to take metformin, you have to take PCOS supplements to help with hormone regulation.  With this prescription also comes the added bonus of being told that I will not be able to conceive (without extreme effort and very unlikely circumstances) which is obviously incorrect.

While I do believe there are some benefits of being ‘diagnosed’ with certain conditions I don’t believe that it’s the end-all be-all of who you are.  Please read my blog post where I go into depth about PCOS and understanding the thyroid connection in the post: PCOS and the Thyroid Connection.

I’ve spent a lot of time learning about how the thyroid works and how a proper diet and exercise can really help bring the thyroid into normal levels.  However, all of that practically goes out the window when you are pregnant.

During my pregnancy my thyroid (TSH) was doing this rollercoaster ride of 3.94 (week 10) to 3.09 (week 17) back up to 3.78 (week 24).  I’ve been supporting my thyroid with different supplements starting week 24 when it went back up with both Thyrocsin and liquid Chromium.  Thyrocsin has supportive supplements that help with the thyroid by aiding in the conversion of T4 to T3 as well as helping support hormone balance (with ashwagandha, iodine, and L-tyrosine) and the Chromium helps with insulin response (managing glucose levels) which work with the adrenal glands (part of the thyroid).  In addition to this I’ve monitored my glucose levels by doing a blood glucose test (at home) where I test my blood sugar levels before I eat and after (2 hours) I eat each meal.  I did this for a week straight and continued the same diet protocol that I have been for the past 2 months.  My blood sugar was great and my insulin response is fantastic.  I’m very happy with that aspect of my health.

During the last visit with my N.D. I decided to do a full blood work test.  Not a common test to do, especially during pregnancy, but being a researcher I was interested in what my blood tests came back regarding Uric Acid, BUN, Creatinine, Calcium, Chloride, Bilirubin, LDH, AST, ALT, GGT, Cholesterol, WBC, RBC, Platelets, B12, etc.  These are the things I’m studying in school so why not know my own numbers for a better complete understanding of how the body works.  I also asked him to do my TSH again but he wasn’t sure that was necessary and indicated that the insurance company may ‘flag’ him if he tries to do the TSH again without reason.  (Besides the obvious factor that I am pregnant and this is something that should be monitored.)

Blood Work Results

When I got my results back a lot of the numbers ranged from ideal to excellent, however there was one set of numbers which was extremely high for what was considered ‘normal range’ and that was the AST and ALT.  Remember, this is not a common test to preform during pregnancy and most people haven’t had this test done unless they have a reason.  When the numbers for AST and ALT came back high and I’m talking the AST norm is 0-40 IU/L and mine came back 146 IU/L with the ALT (norm 0-32 IU/L) at 250.  Those are both alarmingly high and for me this caused concern.  Although, my N.D. didn’t seem too concerned with the numbers being high because the LDH and the GGT came back low (normal) and said that he would check with the lab to see if this was ‘normal’ for pregnancy.    I was definitely ‘alarmed’ when I got off the phone with him.  The ALT and AST are liver enzymes and they reflect the ‘function’ of the liver.  I was very confused at why he was OK with the numbers being as high as they were.  Maybe I didn’t have anything to worry about and maybe I did, but I’m not the type of person that sits on things.  My brain is a highly analytical brain and problem solving is a natural skill that I can’t seem to quiet.  I called back a few days later (Thursday) to check back on my iodine levels and to find out what he heard back from the lab regarding the ALT and AST tests.  The iodine levels came back normal but he hadn’t checked with the lab yet on the numbers.  Now, my idle thoughts were starting to not be idle.  I had an appointment with the midwives on Tuesday the following week and I wanted to know what was going on with my liver.  One thing that I had been experiencing this whole time and I did bring it up to my N.D. when I had my blood drawn were 2 things. First, my leg cramps at night were horrible and second, my legs itched really bad.  My question was, did they go hand-in-hand?  What I ended up doing was making an electrolyte water with magnesium calm to help with the cramps, which helped significantly however, the itching pursued.

I started to research a ton about liver enzymes AST and ALT being high and was not coming to any ‘normal’ conclusions for pregnancy.  Because I know that the TSH was high and my T3 and T4 were ‘normal’ my thoughts about the liver enzymes became increasing persistent that something wasn’t right.  Especially this, my mother also experienced extreme itchiness when she was pregnant and my grandmother died of liver failure.  These are great factors to keep in mind when thinking about my current condition and understanding of my own genetic background revolving around liver functioning.

By the time I had arrived at my midwives I was armed with my blood lab work and knowledge about my concerns.  There were several things that this could be and none of them aligned with pregnancy necessarily but disease of the liver itself.  Cholestasis of the liver, fatty liver, abuse to the liver, and liver tumor.  All of them pointed to the fact that there was something wrong with the liver but nothing stated anything about the thyroid connection.  I sat down with the midwives and said “I had blood work done with my N.D. and my AST and ALT came back high.  I’m experiencing itching of the legs but not the palms or feet.  I don’t have jaundice and there are no rashes.  I’d like to do a bile acid test and retest my liver enzymes” and they wondered why my doctor had these tests run.  I said, I asked him to.  Surprised they looked at me and said “why?” and I said “because I have speculation that there is something effecting my thyroid (TSH) levels and that they are going up and down and while that may be considered ‘normal’ during pregnancy they aren’t within ‘normal’ range and because I am not taking a thyroid supplement I need to understand in totality how my body is preforming.” They knew I was a nutritional therapist but I don’t think they understood that I was a scientist disguised as a nutritional therapist. 🙂

They were aware of implications of AST and ALT being high and agreed that the test needed to be re-run again.  There are many things that can throw off the AST and ALT so it’s always good to double check.  On top of that they ran my TSH again (thankfully) and agreed that it’s something that should be checked often.  They also asked me to do a fasting bile acid test (from my research this was a great indicator of the health of the liver) and I promptly agreed!

The results came back the following week, Monday.  Now, 2 weeks since my N.D. said he would get back to me regarding the AST and ALT from the lab.  The midwife on the phone says “The thyroid level came back at 3.07”  (a great number considering it had gone up previously and this told me that my supplements were helping) “the liver enzymes AST and ALT came back high but lower than what they were previously” (a neutral) “the bile acid did come back high though with the normal being up to 10 present in the blood and yours is a 28”.  My heart sank.

I said “what does this mean?” because to me from research this meant a type of cholestasis of the liver, but that didn’t make sense.  I hadn’t experienced these symptoms prior to being pregnant.. no itchiness or other indicators..

she replied “This means you carry a rare genetic factor called Intrahepatic Cholestasis of Pregnancy (ICP)” again my heart sank, because this meant that I would most likely not be able to have the baby at the birth center through ‘natural’ means.

To confirm I said “So, I won’t be able to have the baby with you then?”

“Unfortunately, I wouldn’t recommend that, the risks are too high” She wanted to talk to me in person but she knew the kind of person I was and that I would want to know as soon as she knew.  She also knew that I’d want to research it (which is absolutely correct).  She asked me to set up a time with her that week (Wednesday) to go over any questions and by the time I saw her on Wednesday I had a lot of questions.  What does this all mean?

After a couple days of depression I started to pick myself up again.  My family and friends were extremely supportive and encouraging.  It means I’ll have to be induced into pregnancy at 37/38 weeks depending on the provider-but I would really prefer that it be at 38 weeks so that my body is more ready to have a baby vaginally and so my doula could be there (as she is currently in Australia).  I’m finding ways to turn things around, turn it into a positive thing.  I did much of the foot work to put myself into the position of finding this condition.  If you’ve ever known anyone who had ICP or who has gone through results of ICP you’ll probably know that most of the time it goes without being noticed up until the baby is born.  At this time there is a very high possibility that the bile acid will cross the placenta touch the umbilical cord (which is incredibly vital for lung development) and can cause high risk for fetal distress, meconium staining, spontaneous preterm labor, respiratory distress and stillbirth.  It’s not something that is taken lightly.  There isn’t enough information on ICP and I’m currently working on a thesis that revolves around identifying precursors of ICP.  I want to thank everyone who has taken the time to be supportive to me, you all have been such a blessing in my life and one that I’m very thankful for.  If you have ICP, there are some great sites that help with information for ICP such as:

If you have any questions or are dealing with ICP yourself please feel free to contact me directly at my personal email: mjr@bestfood4life.com and I’d love to help in any way that I can.

JEM-Signature


Disclaimer: This is not a medical reference for you to use should you have ICP, hypothyroidism or PCOS during pregnancy nor is it intended to treat, diagnose, or cure any of the diseases/genetic factors discussed in the topics (above) as I’m simply sharing with you my personal story.  Everyone should always talk to their doctor before attempting to take any supplements or modify their diet.

Earth Day Tribute: How to save your wilting leftover produce including recipe-Earth Day Sauté (Gluten Free, Vegetarian/Vegan-option, SCD, Candida, Paleo, optional Dairy-free, soy free, nut free)


Today is Earth Day as you all know and it’s always important to remember that the earth provides us the beautiful produce we utilize for our health.  We have a lot to be grateful for and there are plenty of ways to repay our debt including recycling, composting, and not being wasteful with our energy but what about using up old ‘wilting’ leftover produce?

In my house we rarely throw food away.  If I make a recipe for one dish, I’m always using up the leftovers in another dish.  A lot of people I talk to seem to run into the same problems with their leftover produce, “I just made this awesome recipe, now what do I do with the leftovers?” Most of the time for a lot of people that means throwing the fresh (now wilted) produce into the compost-BUT WAIT!  Before you toss out that limp rainbow chard or basil, think about ways you can use that produce in efforts to not ‘waste’ an otherwise still nutritious plant.

Earth day inspired me to also make it clean-the-fridge-day! The past couple of days I have been doing my best to use up all the produce in making whatever meals I could before today’s grocery shopping trip.  While cleaning the fridge, I found some rainbow chard buried beneath the two beautiful kale bunches in the vegetable drawer.  It was looking pretty pathetic, wimpy and well not really something I’d want to toss into a delicious crisp salad.  However, I know that this chard is still very nutritious for me and I really wanted to put it to good use.  I also found last week’s pint of heirloom tomatoes and some shredded cabbage in a container (if you buy cabbage and it starts to go soft after a week, shred it up and sauté it into a delicious cabbage salad which you can use as a snack or as ‘noodles’ for Phad Thai–more on that in another post, yes you can also use fresh cabbage).  The heirloom tomatoes were the ‘baby’ version and two had started to lose their moisture (aka shrivel), so I absolutely needed to find away to eat these guys before they all lost their moisture.  Luckily I have a dog who loves tomatoes and while the two shriveled tomatoes weren’t esthetically pleasing to me, he LOVES them no matter what they look like.  I also found some leftover (about 1/4 cup) of cooked ground turkey meat from a couple mornings ago.  Okay!  I think I got enough to make a pretty awesome meal!

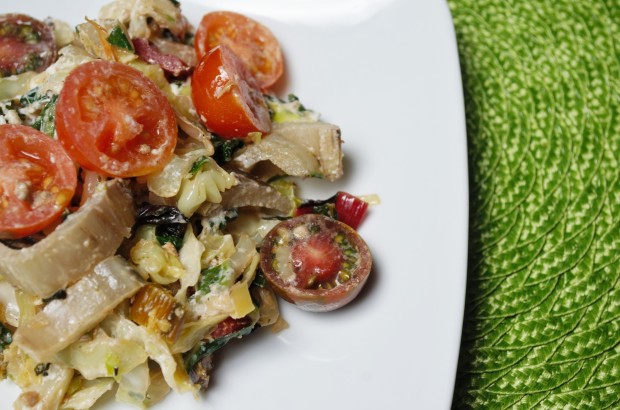
Saute Cabbage and rainbow chard

After I finished adding all the goods to the fridge I decided to open up a new package of goat cheese and use about 1 tbsp. for this recipe.  This was an afterthought, the recipe was already really good without it but I was really craving some goat cheese. Note: you do not have to add goat cheese to this dish to make it tasty but if you got some-why not add it?

(recipe below)

Earth Day Sauté

Tomato, Rainbow Chard, Cabbage, ground turkey and goat cheese

Ingredients:

  • 1 tbsp. Coconut oil
  • salt to taste
  • Half a bunch of rainbow chard finely chopped (or any other greens you find on their last leg)
  • 1 cup of shredded cabbage (thinly sliced)
  • 6 cherry sized heirloom tomatoes halved (or any tomato chopped to 1″ pieces)
  • optional: you can add to this: 1-2 tbsp. chives/green onions, 1/4-1/2 cup sliced leeks, 1/4 cup chopped onions, 1/2 cup finely chopped spinach, 1/4 cup minced celery, 1-2 tbsp. sliced olives and/or any other herb mint, cilantro, parsley, dill, etc..
  • 1/4 cup of cooked ground turkey breast or leftover meat of your choice (preferably lightly seasoned or salted)  optional: if you don’t have leftover meat you can also go vegetarian/vegan on this and add a handful of nuts instead.

Directions:

  1. Heat cabbage on cast iron pan on medium-high for 1 minute.
  2. Stir cabbage and add a dash of salt (this will help dry out the cabbage) cook for another minute.
  3. Add coconut oil and rainbow chard (stir) cook for about 2 minutes. (if you have onions, this is when you’d add the onions)
  4. Add tomatoes, meat/nuts and any other options you want at this time and cook for 1-2  minutes before turning off heat.
  5. Salt and season to taste.
  6. Optional add 1-2 tbsp. chevre goat cheese and stir in to create a creamy base.

Enjoy!

Make a special creation today?  Please share your creation in the comments section below!

Thanks for reading, hope this inspired you to use up your leftover produce!!

JEM-Signature

Lettuce Wrap Turkey Burger w/pan-seared pork belly (Gluten-free, Paleo, SCD, anti-candida, nut-free, dairy-free (all animals), soy-free)


Turkey-Wrap-Logo

This is one to NOM home about!  Seriously delicious!!

I had a mega craving lately for bacon BUT because I’m also healing my husband’s GAPS and following a very specific Anti-Candida type regimen to help with resetting his body as a whole bacon is on the no-no list.  I’m not a big pork person because I believe pork doesn’t really have any nutritional benefit plain and simple.  However, I do like the idea of enjoying eating some pork a few times a year because quite frankly it’s freakin’ delicious!

With all that said we haven’t really eaten much of any pork for a long time-especially bacon.  In fact, it’s cured which really isn’t great for the gut or the colon.  Do some research on colon cancer and you’ll find a long list of ‘fermented foods’ as well as ‘cured-meats’ as a big detriment to colon health.  Another added negative bonus to the beloved bacon is that it’s also made with sugar and additives.  If you’re fighting overgrowth of candida in your body or are on the SCD diet, you need to avoid cured/sugar/additive foods like bacon.  However, all is not lost!

I have found a way to make a type of ‘bacon’ that not only compares to bacon it tops it in my book!  When pan-seared it’s absolutely delicious!  Of course I have a few tricks up my sleeve to give it that sweet delectable flavor that makes bacon so addicting.  Here’s some tips for making your pan-seared pork belly:

First, make sure you get pork belly from your natural foods market or butcher.  Ask them to cut the pork belly into strips (that resemble a slightly thicker bacon).

Second, when pan-searing get your cast iron pan to a nice medium-high temperature.  Pan sear the ‘bacon’ on one side, flip and then add: coconut aminos (this will give it that slightly sweet flavor that compares to the sugar added to bacon during the curing process) and a dash of mineral salt.  Cook for about 2 minutes each side.  The mineral salt will give the pork belly that salty flavor.

That’s it.  I like to add the salt after I add the coconut aminos and once I flip the ‘bacon’ again I’ll sprinkle a little bit more salt on the other side.  The only salt I really use is Himalayan salt, it’s got that perfect salty flavor so I don’t have to add too much salt. (plus its loaded with minerals).

Alright, now lets take a look at the recipe!


Ingredients for Turkey Patties: (makes 6 medium turkey patties)

  • 1 lb. lean ground turkey meat (pasture-raised white turkey meat)
  • 1 egg (optional)
  • 1/2 minced serrano pepper (adds a mild spice, for more heat up it to a whole serrano pepper)
  • 1/3 cup minced yellow onion
  • 1/4 tsp. mineral salt (Himalayan salt)
  • 2 minced garlic cloves  (Add more if you love garlic)
  • 2 tbsp. coconut oil

Instructions for Turkey Patties:

  1. In a large mixing bowl combine all the turkey patties ingredients and mix well with a fork.
    Step-1_-Ground-turkey-Burger-Mixture-LOGO
  2. Form medium size patties with the ground turkey meat and set aside. (makes about 6 patties)
  3. Heat 2 tbsp. coconut oil in a large cast iron pan on high until oil has melted.
  4. Turn heat down to medium-high and add turkey patties
  5. Cook for 2-3 minutes each side until golden brown on each side.
    Step-2-Ground-Turkey-Burgers-pan-seared-LOGO

Ingredients for Lettuce Wrap Sandwiches: (makes 6 servings)

  • Home-made turkey burger patties (see above)
  • 1 large head of romaine lettuce or two small heads of romaine lettuce
  • 1-2 tomatoes (beef, on-the-vine, or Roma sliced thin)
  • Mayo (see recipe)
  • Sautéed red onions in coconut oil (see instructions below)
  • 6 slices of pan-seared pork belly (see instructions below)

Instructions for Pan-Seared Pork Belly and Caramelized Onions:

  1. In a separate pan, pan-sear 6 (4″ strips) of thinly sliced pork belly
  2. Pan-sear each side for about 2-3 minutes each side until pork belly has a nice seared color caramelized color.  (add coconut aminos for sweetness and mineral salt for a salty flavor, combined make a savory bacon flavor)
  3. Remove strips and set aside
  4. Drain pork fat from pan (optional) and sauté sliced red onions in small amount of coconut oil (or use a tbsp. of residual pork fat)

Lettuce wrap turkey burgers w/pan-seared pork belly

Combining the pieces to the lettuce wrap is easy!  I’ll demonstrate the steps with beautiful pictures!

  1. Take one lettuce leaf and add one turkey burger.Step-3_Fully-Cooked-on-Lettuce-Wrap-LOGO
  2. Add sliced tomatoes (I used on-the-vine tomatoes)
    Step-4--Add-Tomatoes-2-LOGO
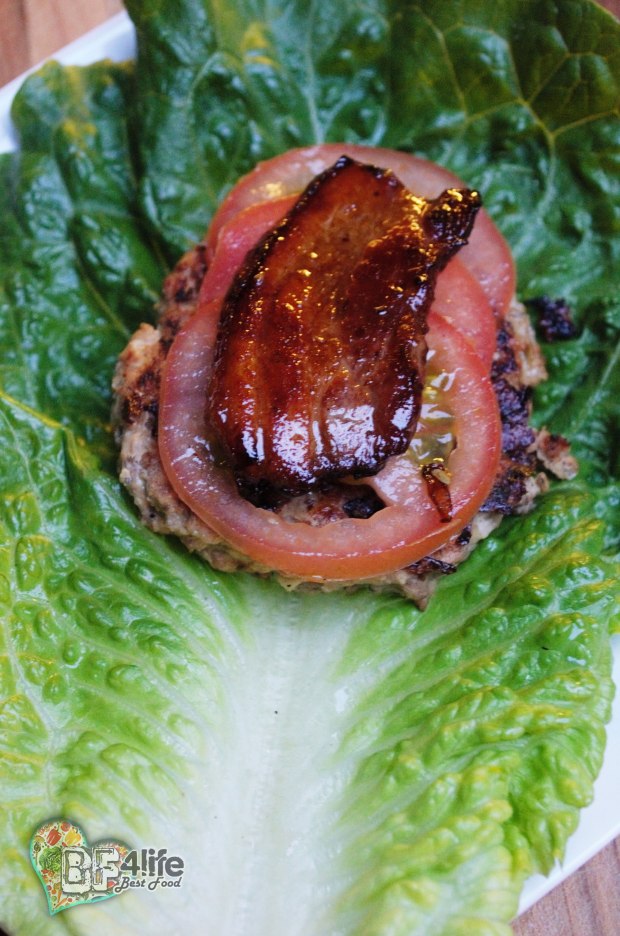
  3. Add slice of pan-seared pork belly aka homemade bacon!
    Step-5--Add-Bacon-LOGO
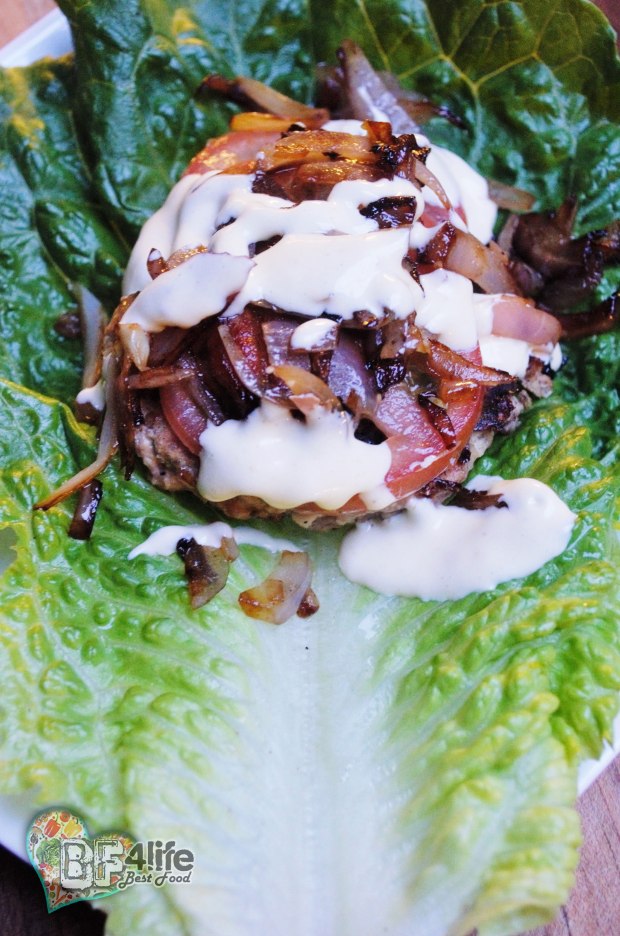
  4. s
    Step-6-Add-Saute-onions-LOGO
  5. Drizzle some delicious home-made eggcellent mayo or Dijon mustard.
    Step-7-Add-Mayo-LOGO
  6. Fold and enjoy!  NOM!

I am in love with this sandwich!  I don’t need cheese and I don’t care about the bread, the flavors make up for whatever anyone can find it to be lacking!!

Hope you enjoyed this recipe as much as we did!!

JEM-Signature

Lettuce Wrap Turkey Burger w/Pan-Seared Pork Belly

  • Servings: 6
  • Difficulty: Moderate
  • Print

Ingredients for Turkey Patties: (makes 6 medium turkey patties)

  • 1 lb. lean ground turkey meat (pasture-raised white turkey meat)
  • 1 egg (optional)
  • 1/2 minced serrano pepper (adds a mild spice, for more heat up it to a whole serrano pepper)
  • 1/3 cup minced yellow onion
  • 1/4 tsp. mineral salt (Himalayan salt)
  • 2 minced garlic cloves  (Add more if you love garlic)
  • 2 tbsp. coconut oil

Instructions for Turkey Patties

  1. In a large mixing bowl combine all the turkey patties ingredients and mix well with a fork.
  2. Form medium size patties with the ground turkey meat and set aside. (makes about 6 patties)
  3. Heat 2 tbsp. coconut oil in a large cast iron pan on high until oil has melted.
  4. Turn heat down to medium-high and add turkey patties
  5. Cook for 2-3 minutes each side until golden brown on each side.

Ingredients for Lettuce Wrap Sandwiches: (makes 6 servings)

  • Home-made turkey burger patties (see above)
  • 1 large head of romaine lettuce or two small heads of romaine lettuce
  • 1-2 tomatoes (beef, on-the-vine, or Roma sliced thin)
  • Mayo (see recipe)
  • Sautéed red onions in coconut oil (see instructions below)
  • 6 slices of pan-seared pork belly (see instructions below)

Instructions for Pan-Seared Pork Belly and Caramelized Onions:

  1. In a separate pan, pan-sear 6 (4″ strips) of thinly sliced pork belly
  2. Pan-sear each side for about 2-3 minutes each side until pork belly has a nice seared color caramelized color.  (add coconut aminos for sweetness and mineral salt for a salty flavor, combined make a savory bacon flavor)
  3. Remove strips and set aside
  4. Drain pork fat from pan (optional) and sauté sliced red onions in small amount of coconut oil (or use a tbsp. of residual pork fat)

Putting the pieces together for the Lettuce Wrap: (Instructions)

  1. Take a piece of romaine lettuce and add one turkey burger
  2. Add toppings (tomatoes, pan-seared pork belly, caramelized onions, and mayo)
  3. Fold and enjoy!

Quick & Easy Eggcellent Mayo (paleo, gluten-free, soy-free, scd, anti-candida, dairy-free (all animals), nut-free)


Eggcellent Mayo LOGO

A single and important stipulation about this recipe:

#1- This requires you to use ‘raw’ eggs which are healthy and good for you IF they are the right kind of egg.  What is that?  Simply put: organic pasture-raised eggs.

There are a lot of “titles” to egg names that do what they can to meet the minimum requirements to satisfy whatever the ‘new’ name of the game is for example: cage-free or free-range.  The media is simply great at creating hype about something where confusion sets in leaving us common folk confused as all hell as to what the heck egg is actually best and ‘safest’ for us to eat.  Truth is no matter what the label says… if the chicken isn’t free-roaming on an open field (not a small patch of dirt) then assume it’s not the kind of chicken egg you want to eat.  Why not?  They are simply not ‘safe’ to eat raw.  There are a lot of brands of eggs out on the market today and it’s really hard to visit all of their facilities in order to determine which farms actually meet the ‘standards’ without the misleading information.  We’d like to believe that cage-free really means that these chickens are left into an open field to eat whatever foods they choose to eat (instead of corn, soy, or whatever mass produced cheap ingredients are available) and trust me whatever the minimum requirement is set for a specific label, expect that minimum requirement to be met to the T and no more.   Yes, organic pasture-raised eggs are definitely more expensive (unless you can find them local) and there’s a reason for that.  The feed they give their chickens are on par with something you’d find at an open salad bar: berries, grass, veggies, and protein (in the chicken’s case that’s worms, bugs and other delicious insects that are packed full of nutrition) which is what you want, when you are eating an egg!

You can read more about the misleading ‘labeling’ and nutrition facts about eggs here.

Compare nutritional value of a conventional egg to a organic pasture-raised egg

  • 5 times more vitamin D
  • 2/3 more vitamin A
  • 2 times more omega-3 fatty acids
  • 3 times more vitamin E
  • 7 times more beta carotene

Read more about Raw Egg Safety here.

Warning:  I do not recommend eating any egg raw unless it meets the regulations for the organic pasture-raised eggs, which you can find a reliable source from.
Here is a quote from the whfoods.org (The George Mateljan Foundation
for The World’s Healthiest Foods):

If you do plan to include raw eggs in your meal plan, we recommend that you locate and purchase eggs from a farm in your area that not only produces certified organic eggs but also take steps to ensure a genuinely natural lifestyle for the hens, including a pasture-based diet from a natural landscape with ecologically balanced vegetation. For help in locating a small organic and sustainable egg producer in your area, we recommend that you visit both of the following websites.

Concerned about High Cholesterol?  Read more about the myth with eggs here.

Interested in finding a local provider of organic pasture-raised eggs?  Search localharvest.org to find out where you’re closest supplier is!

I’ve also written a whole bunch about eggs on my website www.bestfood4life.com and if you have time, I recommend checking it out.


Alright, now that I’ve provided to you the forward to eating raw eggs and the benefits/facts regarding the ‘types’ of eggs I recommend based off my education and research.  I’ll move forward with the actual recipe. 😉

This recipe is SUPER easy to make and I have spent a lot of time trying to figure out how to make the best tasting mayonnaise.  I don’t really like an overly olive oil flavored mayonnaise and when I’ve used coconut oil the texture was more like butter (which I actually ended up writing a recipe for, see future recipe.)  I’ve tried a lot of variations and haven’t really been happy with the flavor or consistency.  I don’t use canola oil as it’s simply not healthy to eat.  I’m all about nutrition and packing in the most nutrition and flavor I can is my goal!

Quick & Easy Eggcellent Mayonnaise Recipe

Mayo-with-half-cup-serving-total-LOGO

Ingredients:

  • 2 whole organic pasture-raised eggs (room temperature)
  • 1 lemon juiced
  • 1 tsp. raw coconut vinegar
  • 1/4 tsp. mineral salt
  • 1 tsp. yellow ground mustard seed (dry)
  • 1/2 – 3/4 cup walnut oil

Instructions:

  1. In a blender, mixer, or food processor mix together the eggs, lemon juice, and vinegar.
  2. Mix for a few minutes and allow to set for a few minutes. (I prefer to use a whip the egg with a whisk for a thicker consistency.)
  3. Add the salt, mustard, and walnut oil and blend until you get the consistency you desire.  (I start with 1/2 a cup of walnut oil and work my way up from there depending on how I plan on using it.)  No matter what consistency, the taste will be amazing!  Also, taste your mayo if it’s not salty enough add a dash or two more.
  4. Pour into container, cover and refrigerate for up to 1 week.
    Tip: you can use this mayo right away, but if you want it to be a thicker consistency allow for 1-2 hours of refrigeration before using.

Play around with different oils for a slightly different taste.  Here are some oils I recommend trying:   organic pumpkin seed oil, organic light extra virgin olive oil, organic sunflower oil, and if you really love the taste of avocado-organic avocado oil.

What oil do you prefer the taste of?

Quick & Easy Eggcellent Mayo

  • Servings: 3/4 cup
  • Difficulty: Easy
  • Print

Close-up-Mayo-LOGO

Ingredients:

  • 2 whole organic pasture-raised eggs (room temperature)
  • 1 lemon juiced
  • 1 tsp. raw coconut vinegar
  • 1/4 tsp. mineral salt
  • 1 tsp. yellow ground mustard seed (dry)
  • 1/2 – 3/4 cup walnut oil

Instructions:

  1. In a blender, mixer, or food processor mix together the eggs, lemon juice, and vinegar.
  2. Mix for a few minutes and allow to set for a few minutes.
  3. Add the salt, mustard, and walnut oil and blend until you get the consistency you desire.  Start with 1/2 a cup of walnut oil and more for consistency.
  4. Pour into container, cover and refrigerate for up to 1 week.
    Tip: you can use this mayo right away, but if you want it to be a thicker consistency allow for 1-2 hours of refrigeration before using.

Pregnancy Update (30.79 weeks pregnant)


Wow!  It’s been almost 10 weeks since I posted a pregnancy update with picture.  Where has the time gone???  I have been ridiculously busy in trying to prepare for the baby (and you’ve heard from previous posts what I’ve been up to as far as creating a nursery with the mural, etc.) as well as working on what feels like 100 other projects simultaneously.  Here’s a picture update, I just took the picture.  I was looking for pictures I had taken since the 21st week and couldn’t find any!  I know I kept saying in my head, I gotta take a picture this week–but for one reason or another I just didn’t.  Here ya’ go!

Pregnancy- Week 30.74

Today I have an appointment with my naturopath doctor (ND) which I’m actually very excited about!  I get to look at the blood work results from the past 3 months, for me that’s very exciting.  🙂

The past 10 weeks have been riddled with obstacles and one of them was definitely the pregnancy itself.  Up until 2 weeks ago I was doing pretty good with my energy.  I’ve felt some drain on my energy a couple of days here and there sprinkled throughout the pregnancy but it usually went away after a couple of days.  Unfortunately, those days are over and I’m now feeling the pregnancy pretty much full throttle with no signs of slowing down.

Pregnancy yoga up till two weeks ago was pretty good, I felt energized after the sessions with only a slight ache the day after.  Two weeks ago I was in the middle of class and found myself checking the clock what seemed every 5 minutes.  When was it going to end?? I felt like I had been doing the class for hours only to find that 15 minutes had passed.  The class is only an hour and 15 minutes long, but still!  I caught myself looking up at one point (when there was still 30 minutes left) and as my eyes came back to the yoga class the woman next to me (who was also looking at the clock) says, “welcome to the third trimester”.  She is one week further along than me so it felt kinda good knowing that I wasn’t the only one suffering through the class.

Where is the energy?

The days pass…I have good days where I almost feel normal and other days when I am almost completely exhausted after doing two squats.  TWO squats.  I had been riding the recumbent bike for most of the pregnancy until the beginning of March when the movement was too much for me to appreciate.  I felt between nauseous and out of breath, which if you know me sucks even more because I LOVE off-road driving.  My husband attempted to take me off-roading for my birthday and made it maybe 400 ft. before I begged him to turn around with the saddest look on my face ever!  But, like I said there are good days and there are the ‘off-days’.  During Easter Sunday we took a drive to Mt. Rainier and did a little off-road driving and I did pretty good!

For the most part I’ve been really busy cooking, creating recipes, studying, food photography, business expenses, home expenses, school, studying, research, school, more school, clients, test research, clinical research, organizing, did I mention school? and purchasing things here and there to finish up the nursery and baby shopping.  The most recent purchase for the nursery were the crib mattress and the daybed mattress.  I was extremely picky about both as I wanted the mattresses to be safe (and all that entails) for her.

Infant/Child Mattresses

Most crib mattresses are covered with vinyl cover and contain off-gass from chemicals from the vinyl as well as fire retardants.  You can read more about the hazard of Vinyl Chloride here.  It’s even more important for infants and children to be sleeping in a non-toxic mattress because most infants actually sleep for 18 hours and because they are developing their bodies they are even more susceptible to the concentrations of off-gassing even more greater than an adult.  Also, there have been theories that blame SIDS on toxic bedding material and mattress material.  If you’re interested in reading up on that, intellibed (where I purchased the twin mattress from) has some information here.

There are a few great companies out there that offer options for infant mattress bedding and I strongly urge you to do research before purchasing a crib mattress.

If you’re looking for a good mattress for your crib, I recommend any one of the following:

(In order of cost, because organic crib mattresses can be pretty expensive-but worth it! Keep in mind that the price isn’t always monetary…)

  1. Quilted organic cotton & wool crib mattress  $259-$465
  2. intelliBEDmini Crib Mattress: $399 + Shipping
  3. All Wool Organic Mattress: $640 + shipping

The daybed mattress that I purchased is for when she moves out of the crib and into a bed.  I didn’t purchase one of those 9-in-1 cribs, they just weren’t for me.  I wanted her to end up having a daybed in her room with a trundle instead of a standard bed.  This way when Nana was staying the night or when she had a friend stay the night, they would have a place to sleep-but mostly the former.

The mattress I chose is a twin sized mattress that she’ll be able to use for the next 20 years.  It has a 20 year warranty and because you spend a lot of your life in bed it is incredible for your body.  In fact, it’s a better mattress then the local organic one we purchased just last year for ourselves-because it has intelli-gel.
It’s also organic, made with high quality materials and doesn’t contain any harmful chemicals, such as: Boric Acid (a toxin which causes skin irritation), Rayon (a synthetic fiber with various chemicals), antimony (attributes are very similar to arsenic which causes respiratory problems), Melamine resin (a form of formaldehyde), PCDE’s (a phased out fire retardant but many ‘older’ models still contain-before 2004.)

If you are in the market for looking for a bed for yourself; maybe you suffer from back pains, headaches, body aches, insomnia, and many other ailments (that can be linked to mattresses) I suggest checking this company out.  You can read about them, watch videos, or even call them and talk to their very knowledgeable staff.

Mattress company: Intellibed

This is the mattress we bought: Twin intellibed 20

I recommend you check out all the options and find which one is best for your needs. 🙂

Enough about mattresses although that has been a large portion of my life for a couple of those 10 weeks.  I was glad to finally purchase them and get it over with… now onto other things like dual electric breast pumps.

I do plan on breast-feeding but I know that I’ll need an electric breast pump for when we do travel as my goal is to breast feed for at least 1 year (with the introduction to puree food as well).  I don’t know exactly how it’s going to go, but it’s best to be prepared and if I’m going to get a breast pump, I might as well go with the dual one (as I hear from friends that it’s a lot easier to do both at the same time with the little yield at first).  I’m also going to make sure I have one just incase the breast-feeding doesn’t go as smoothly as planned as well as some back up options incase I’m not producing milk either.  (like a goat milk formula)  I am all about being prepared as much as I can be-though I really hope the breast-feeding works out!! 🙂

There is still so much to talk about but unfortunately that doctor’s appointment I mentioned earlier is coming up now and I have to leave for it.

This weekend I’ll be cracking away at the garage with the husband and trying my hardest to take it easy.  There’s a lot going on next week.  I will be posting more recipes too because lord only knows how many recipes I have to post.  Like for example Easter recipes!  A little late for that.. haha good thing I’ll be prepared for next year though and possibly a seasonal/holiday cookbook too.  Though I won’t get too far ahead of myself.  Right now, along with all the other things I’m working on I’m also putting together a cooking class for adults and kids.  It’s a nutritional educational/cooking class and I’m really excited about it!!

I hope everyone is doing well and thank you for reading my blog!! 🙂

If anyone has any recommendations for me please post in the comments section. 🙂

JEM-Signature